Showing posts with label inks. Show all posts

Friday, 15 January 2010

Dream Journals & an ATC

I finally finished a couple of pages for one of the Journals of Dreams in the round robin I'm involved in.  This journal is Tracy's from the US, rather a large book so quite a different scale for me to be working on, and it's now on its way to Australia for the next leg of its journey.  (No more snow, we've had torrential rain this morning and that cleared away any remaining ice - not particularly pleasant to be out in but at least I can walk around without fear of falling over)!  I used a similar format for these pages that I'd already tried out in a board book "challenge" in another group, we had to create sample pages using step-by-step instructions for a variety of techniques - turned out to be fun and a good way to get you thinking about alternative ways of working. 

For the "dream" pages I first gessoed over them, then added blue acrylic paints, torn paper, black gesso lines (didn't have any black acrylic to hand), images from magazines, stamped a swirly image over the pages using silver acrylic paint, found a relevant quote about dreams off the Internet, cut out and added across the pages, along with a torn strip of scrapbooking paper.  The pages were also "sponged" with watered down black gesso and the edges distressed with TH "black soot" distress ink.  I added lots of stars over the pages using a white gel pen, as well as a plastic star shape which I'd found in some packaging over Christmas, painted with silver acrylic paint and with "dream" and dots added using dimensional blue paint.  I hope Tracy likes these additions to her journal when she finally receives it back.


I also got round to making some ATCs yesterday, some were for a regular monthly partner swap in an internet group, but this one will go into my "small" stash of ATCs for swapping.  I used the remains of some background card I'd made using a mix of bright inks, to which I added a Paperartsy vintage stamped image in black Archive ink - I rather like the contrast of vintage with bright rather than always sticking to more muted tones.  I already had the stamped phrase as an offcut, sitting on my desk, and I just thought it expressed exactly what might be running through the young lady's head - the feather and glitter added to the fun element of the card.  Hope you like it!


Sunday, 10 January 2010

A Little Bit of Alteration ........

I can't believe a week has gone by since I last posted here.  We're still in the "big freeze", car marooned on the drive (just too icy and treacherous to risk moving it) and basically I haven't been further than the garden for the past week, talk about getting "stir crazy"!!!  I hope everyone has kept safe and sound during this icy spell, no slips or broken bones.  Despite being so chilly outside, it does look rather lovely - blue skies and bright sunshine - and if I wasn't such a "wimp" on the ice (I can do a brilliant impression of a penguin - LOL), it would be a gorgeous day for a walk.  Oh well, I'm afraid here I'm staying put until the thaw sets in.

I finally got around to finishing something that I had started just before Christmas with the intention of giving it to my sister Lindsay as part of her Christmas pressies - unfortunately, time sort of ran out on me and I had to put it to one side until now.  So, Lindsay, looks like you might be getting an extra belated present, always supposing you'd like it!

I always scour the charity shops when I'm in town, you never know what you might pick up there, and one of my latest acquisitions was this metal tealight holder, which I thought was just asking to be decorated.


The tealight holder was already painted green and I decided to leave this as it was, but you could change this if you wished by sanding it down, adding a layer of gesso, and then painting with acrylics over the top.  Instead, I chose to sponge all the metal parts, both inside and outside, with alcohol inks - I used a combination of Latte, Butterscotch and Gold.  (Before sponging the metal parts, I carefully removed the handle, lid and glass panels - be VERY careful not to cut your fingers when removing the glass, you might like to protect them with a cloth or paper towel).  This is also a very messy process, my fingers were covered with alcohol ink - it helps to squirt a little of the blending solution onto your hands when you come to wash them and give them a good scrub.


The next step was to pad out the space where the tealight would normally sit - I firmly squidged down a good wad of cotton wool, adhered with glue.  I had bought a small "guardian angel" resin figure which exactly fitted over the top of the tealight holder and I glued it down with some Glossy Accents. 


I added a layer of gold Stickles around the base of the "angel" and left it until it was completely dry (patience required here)!


The next thing that I decided to do was to adhere a sheet of double-sided tape to one side of two of the glass panels.  I then laid some gauzy fabric (mine had butterflies and dragonflies on it) over the glass with the right side of the fabric facing the sticky side of the glass.  I cut away the excess fabric and then slid each glass panel back into the tealight holder, either side of the hinged door, with the plain glass panel in the back and front.


I dribbled some more Glossy Accents around the base of the tealight, placed a white feather behind the angel and scraps of scrumpled fabrics/netting to cover the base.


I continued adding more embellishments around the "angel" - a butterfly charm (I only had silver ones so I altered it by colouring it with a gold Krylon pen), bronze pearls and a pearly bead chain, all glued to the netting/fabric with drops of Glossy Accents.


I covered the tealight "funnel" with double-sided tape and wrapped it with a vintage piece of tassel-edged trim.  I ran my gold Krylon pen around all the edges of the lid and panels, then wrapped the handle with thin gold ribbon and the beaded chain.  I also fastened a "word" charm to the handle (a Tim Holtz Philosophy charm - Believe), which I softened with a little gold metallic rub-on.  I reassembled the tealight holder then, as a final step, using a cotton bud, rubbed copper Stickles (I'd run out of gold) over all the surfaces.  Again, make sure to leave plenty of time for drying before you handle the finished item ..... and here it is ....

I hope you like it .... and perhaps it's given you some ideas for altering small items that you might come across in your local charity shop or car boot sale.  Why not have a go at giving something old a new lease of life and if you do, I'd love to see pictures of what you come up with!

Meanwhile, don't forget about the "Out with the Old, In with the New" ATC swap I'm running here - there's plenty of time to have a go at making some cards (the closing date is 12th February) - several have signed up already and I can't wait to see what everyone comes up with!


Thursday, 26 November 2009

Paraphernalia

As promised, here are photos of all the pages I created for my "Paraphernalia" board book.  It was great fun making this, especially having a different title to work on for each page, and I really got engrossed in working on it.  Each page in the board book I chose to use had a curved top to it (like a handle) which was ideal because I could stamp the title on each one, as you can see from the pics. 

If you've never thought of altering a child's board book before, then I'd encourage you to have a go - you can pick them up cheaply in all sorts of places (charity shops, car boots, discount book stores, pound shops).  Start off by preparing the board book either the hard way (sanding the surface of each page to form a 'key') or the easy way (if you're very lucky, you can peel away the top thin layer of the page leaving the white inner card core).  Once you've done this, paint a layer of gesso over every page, front and back.  When this has dried, you're up and running ...... you can throw more or less anything at these books, paints, inks, papers, stamping, collage, embellishing ...... just anything you fancy trying out really.


This is the front and back covers.  I used acrylic paints, then stamped a pattern in purple and pink over the pages, and buffed the edges with gold metallic rub-on.  The swirly paper on the front cover was created using a child's SpinArt toy (great fun!) and the word "Paraphernalia" was added using an assortment of alphabet stickers (you don't have to stick to all the same font style for something like this - we've probably all got sets of alphabet stickers where there aren't enough vowels left or only one "T" or something so we can't make up a word with what's left - then using them in this way still works and adds a touch of quirkiness).  I added my details on a torn strip of decorative paper to the back of the book along with a dictionary definition of "paraphernalia", then finished off by threading some fancy fibres and a couple of beads down the length of the spine.
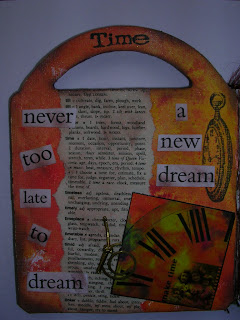


This is my "Time" page (acrylic paint, stamping, torn dictionary page, cut out words, a Crafty Individuals image and metal embellishment knotted with gold elastic thread).


"My Childhood" Page (decorative paper, inked edges, stamped words, a photo of Lindsay and I, handwriting, paper flowers with brad centres and a flower ribbon 'daisy' border).


This is the "Vintage Transport" Page (a collage of torn vintage transport papers and figures designed by Lindsay, a faux stamp and a rubber stamped penny farthing covered with Glossy Accents).


My "Fly Me to the Moon" Page (inked background, stamped and coloured images, acetate tree image, child and butterfly wings from Crafty Individuals, butterfly silhouette shapes and self-sticking ribbon border).


The "Gone Fishing" (for dreams) Page (painted background, fairy and fish paper images with Glossy Accents, pond weed cut from angelina fibres overlaid with alcohol inked acrylic, rubber stamped dragonfly and words).


I chose Summer for my "Seasons" Page (paper with ink distressed edges, a pocket containing a tag with fibres and charms, rub-on word, stamped sun, Crafty Individual image and metal embellishment).


I used all sorts of things on this "French at Heart" Page (stamped tissue paper laid over decorative papers and stamping, a stamped and embossed frame with a Parisian-themed image inside, covered with beads, Paris stickers, a stamped heart shape with feathers and a French coin).


Here is the "Lighthouses" Page (I stamped seashells onto the inked background, the sand was torn strips of more inked background paper, with various images, words and postage stamp added).


Well, this was my "Zetti" Page - or my attempt at it anyway (acrylic paints blended for the background, zetti-type stamped image which I altered with a black pen, a stamped cat image tinted with white pen, then various swirls, dots and words added with Marvy Le Plume pens).


For my "Very Extraordinary Queen" Page I just had to use this image I found of Queen Elizabeth I, as I've always believed her to be one of our greatest monarchs.  I used acrylic paints for the background then handwrote various quotes and facts all around her face to fill the page.  I used some self-adhesive crystals and pearls to highlight her ruff and 'coronet'.


This is the "Gothic Architecture" Page (again, the background was done with acrylic paints, then collaged over with architectural imagery from an old sepulchral book that we have, an acetate 'gargoyle' image and a distressed piece of text about gothic architecture, plus some stamping in sepia ink).


This is the final "Angel Shrine" Page.  I had an extra page in the board book so I had the idea of cutting out the shrine shape in one page, then gluing it down over the angel image on the inside back page.  I stamped and embossed the shrine onto matboard, over a painted/torn paper background.  The heart if a Tim Holtz grungeboard one which I inked up, then added a layer of Beadazzles (microbeads) across the shrine and heart with Glossy Accents.  The "angel" quote was stamped onto the page.

Before I sign off for the night, thanks for the comments already received and I've added your names in for the Christmas draw - but sorry, folks, I'm afraid you'll have to make do with the bead kits and ATC - Mia is definitely NOT part of the deal!  *LOL*

Monday, 12 October 2009

Vintage Birthday Image

Thought I would post this vintage postcard image of a young girl with flowers for you tonight.  It may appeal to some of you to add to any cards you're making. 


I like the dreamy faraway look in the little girl's eyes and the subtle colour tinting.

I finally got round to doing a little bit of embossing today for a swap I'm in.  We had to create a 6" x 6" square tile and 12 inchies, all from matboard, using a particular colour range from turquoise through green to terracotta.  The only techniques allowed are inking, stamping and embossing - no embellishments!!! (which is tricky for me as I'm a great one for adding a few "twiddly bits")!  Anyway, I inked and stamped the "tile", lightly embossed a flourish around each corner, and then used clear UTEE to triple-emboss (well, it was double-emboss really, it didn't need a third coat) to cover the entire tile.  For the inchies I used a rubber stamp that Lindsay had given me - it was ideal because it has 12 cat images on it, each one 1" square.  The stamp is called "Kitty Tiles" (4578) from Hampton Art Stamps.  I made 24 inchies in total so that I could keep extras to use on some future ATCs.  Again, I "double"-embossed each little inchie.  So these will probably get posted out tomorrow and then Ali (our hostess) is going to mix up everyone's tiles and inchies so we'll each get back a tile complete with a pattern of assorted inchies on it.  I just love these colours!


I've also made a couple of ATCs for a Lucky Dip swap, we each choose from a list of titles - my choice was "Midnight", "Botanical", "Caged Bird" and "Weathered".  Here are pics of "Midnight" and "Botanical".  Two down, two to go!  I also made another botanical-themed ATC and have another two part made, as I had enough vintage bits of paper left over from the first one.  I used distress inks over the rather shiny plant paper and on the torn strips of paper from an old encyclopedia.  I used gel medium to adhere the paper strips to the background and as a coating over the whole card, which got rid of the shininess.  The card on the "Botanical" ATC is one of those old picture cards that came free in our tea boxes, the equivalent of cigarette cards, do you remember them?  I've added a flower shaped button, threaded with gauzy green ribbon, a skeleton leaf and a rub-on word.


Of course, I had to use Lindsay's "owl" stamp on my Midnight card - I've been using it a lot lately, plus her technique for blowing ink with a straw to create the stark tree branches the owl is sitting on.  I do like those techniques that turn out so random, you just never know what they're going to end up like!


I had the final set of instructions for completing the zetti pages I've been working on too - having added outlines and extra patterns to the pages with crayons or pastels, we now have to spend the next few weeks/months adding journalling to our pages, whatever we want, whenever the mood takes, and on which ever page fits the words (or vice-versa).  I've no idea how my pages are going to turn out, I'm not sure that what I've done so far looks "zetti", but .... we'll just have to see.  Apparently, there's no right or wrong way to do this, I guess I'll know when I've done enough on each page, then I send one out to each of the other participants.  Check out Elena's blog (My Name is Elena) in my bloglist to see what she has done - Elena has really got the hang of this zetti art and is turning out some wonderful looking work - well, I think so anyway, I know it won't appeal to everyone!

Sunday, 20 September 2009


My sister, Lindsay, was giving a crafting demonstration today (well, yesterday now) at the Strikes Burnside Garden Centre, near Blackpool, so I went over to spend a few hours there and pick up a few crafty technique tips from her. 

As well as demonstrating Nestabilities, amongst other things Lindsay also showed us how to create a lovely wintry background for a card using distress inks, water and a mini-mister - she then removed some of the ink from inside one of the stamped images (a dove), using a water brush - the ink disappeared as if by magic!!  It's a technique I'm definitely going to have a go at! 

Here are a few pics of some of Lindsay's cards (check out her black inky thumb on the robin card pic)!!!


It was quite a busy afternoon and I had the pleasure of meeting up with Joanne, who had admired my "mermaid" atc (pic in previous post) - so as I had my meagre stash of atcs with me (just got to make time to make some more!), we exchanged cards - my mermaid card for a lovely one of a stamped embossed bird (one of my favourite themes at the moment) on an orange (one of my favourite colours at the moment) inked background with the word "blissful" - I was very happy to have it.  I also did an atc swap with Lindsay.  I don't often get the opportunity to swap atcs face-to-face so it was an unexpected treat.

By the way, Lindsay has been having some computer/internet problems for the past few days so has been unable to contact anyone via email or update her blog .... hopefully she'll be back online in a day or two and posting to her blog again.

I'm planning on running a themed atc swap on my blog soon, not quite ready to say what it will be yet, but watch this space!


Wednesday, 16 September 2009

Last week I said that I was joining in a project to create zetti pages and the first thing we all had to do was cover our pages, front and back, with a colour wash - using one or more colours.  So I had a session creating very colourful backgrounds onto some heavy watercolour paper.  For some I used acrylic paints and others, "Sticky Fingers" acrylic inks - they all turned out pretty bright and colourful (which was my aim), as you can see.
The backs of the pages were done in different colours to the front, but the size was bigger than I needed for the project, so I had to cut them all down with my guillotine - which left me with lots of colourful strips, including strips where the pages were pulled off the binding in the watercolour pad.
So I then thought I'd like to make some atcs using some of these jewel-coloured offcuts and also try to make use of the torn binder strips too, just to see how effective they could be and not waste anything.  These are the three atcs I came up with - I've used some vintage-style rubber stamps on a couple of them, along with extra embellishments - brads, adhesive gems, colourful plastic discs, stamped hearts with gold cord and dictionary words.  For the mermaid card I added some alcohol inked clear acrylic, beading, angelina fibres and little shells - all scraps and oddments from my stash.  I'm quite happy with the way they all turned out and it just goes to show what you can make with a few offcuts and bits and bobs lying around.

Now that I've finished my zetti background pages, the next thing we have to do is add some images and paper cutout shapes to each page - it's all new to me so I'm intrigued to see how my pages eventually turn out, but it's certainly fun to have a go at trying out a new style of art or technique.  I'll let you know how I get on!