Wednesday, 23 December 2009

Merry Christmas and a Happy New Year

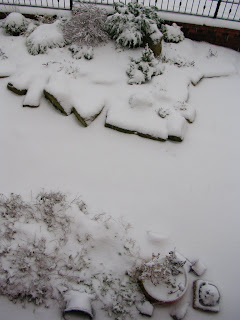
I've been busy this past week, trying to get myself all organised for Christmas, so no time for crafting I'm afraid.  But this year, for the first time I can ever remember, certainly not whilst we've been living in this house (some 20+ years), plans have been thwarted by the weather (or more precisely, the snow)!  I know, I know, in other parts of the world the amount of snow the UK has been experiencing would be looked on as just a sprinkling, but here, it has caused real problems around the country - people stranded, cars abandoned or wrecked, broken limbs from falling over, and although main roads have been "gritted" to a degree all the side roads (ie where everybody lives) have been neglected. 

My car has been buried under a mound of snow for the past three days and is only now just emerging as the snow begins to thaw.  The same at my parents' home, they couldn't get beyond their drive today, everywhere is too icy - I had planned to take up some Christmas food and pressies for them this afternoon, but we've abandoned that idea for today.  Now all the food (that won't fit in my fridge) is chilling out in the garage until tomorrow.  Lindsay and David also have to make the journey over today so hope they don't encounter too many problems with the roads.  It's our dad's birthday tomorrow (Christmas Eve), so we are all supposed to be gathering at our house to celebrate ...... anyway, fingers crossed, it looks like the snow is finally starting to vanish, so all should be well by then.


Mind you, it has been lovely to look out at the snow in all its beauty, especially where it lies thick on the ground with no footprints in it.  We have an old tree at the edge of our driveway and the weight of the snow brought a large (and I mean LARGE) branch down onto the pavement (it's the size of a small Christmas tree!), so we had to drag that back onto the drive.  Luckily, it didn't land on a nearby parked car!


Yesterday evening the sky looked really dramatic too, all turning a fiery pink, as a backdrop to the snow-laden trees and rooftops - and the garden took on a mysterious, eerie glow as dusk fell.


Little Mia has been enjoying "helping" to wrap Christmas presents and exploring the radio - she couldn't figure out where the music was coming from and wondered if she could climb to the top of the aerial! 


We've tethered the top of the Christmas tree with string to avoid it toppling over ..... Mia has had great fun climbing up the trunk on the inside as far up as she can get before we catch her!  One night she came running into the living room with a garland of tinsel streaming out behind her which she could only have pulled off the tree ..... if only I'd had my camera to hand, it was such a funny sight! 

I hope you all have a very happy time over the Christmas/New Year holidays, however you choose to celebrate ..... and I'll be back posting again in 2010, hopefully refreshed and ready to go with new challenges and ideas! 


Sunday, 13 December 2009

Guardian Angels

The Guardian Angel swap that I was running was swapped out at the beginning of this week - we were a very "select" group of four (I guess everyone was caught up too much in preparing for Christmas to take time out for this one - or maybe it didn't appeal).  Anyway, here are pics of the ATCs and ornaments that we all created - as you can see, everybody put a different interpretation into their designs .......


Joanne's


Sheila's


Lindsay's


Mine

I used Crafty Individuals frames and images to make my ornament, along with embossing, fabric and feathery embellishments.  The ATC, again, used a Crafty Individuals image (they're one of my favourite craft companies, can't you tell?), matted over a gauzy ribbon fabric, and embellished with gold stickles, beads, ribbon and dictionary "angel" definition.  (The stars are part of the ribbon's pattern).

Thanks to Joanne, Lindsay and Sheila for participating in this swap - I hope you all enjoyed it - I loved seeing what everyone created.

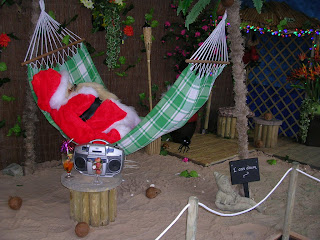
Today I took my parents out to the local garden centre for a spot of lunch and a bit of Christmas shopping - I love to see all the Christmas decorations laid out, the glittery baubles, the trees, sparkly fairy lights, scented candles, but we were amused by this Santa Claus taking time out in his hammock at the entrance to the garden centre, dreaming of some faraway golden beach no doubt (his stomach actually moved up and down as though he was really breathing - LOL) - I just had to take a photo of him ......


I wonder what you're dreaming of this Christmas?

Friday, 4 December 2009

And the Winner is ......... ?

Today I made the draw for my little Christmas Giveaway and who better to help me than Mia - she was a brilliant assistant!! 

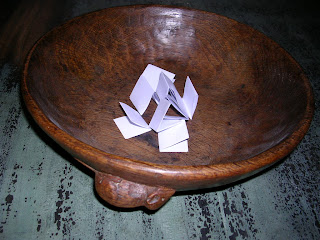
First, I wrote out everybody's names on pieces of paper, folded them up and popped them all into a wooden "Mouseman" bowl that we have (well, it seemed appropriate to use a mousey bowl if Mia was going to pick a winner out of it). 


When Mia saw all the bits of paper in the bowl she immediately dived in, picked one up in her mouth and ran off with it (I wish I'd been quick enough to take a photo of that particular moment, but she is just soooo fast) .....


Here is Mia with the winning "ticket" .........


..... and the WINNER IS .........


Well done and congrats, Denise!  Just let me know your address and I'll post the Christmas kits and ATC out to you as soon as I can .... hope you enjoy them all and have fun making the kits up.

Thursday, 3 December 2009

Where does all the time go?

It's frightening how quickly time is flying, suddenly realised it's been a week since I last posted ..... and I've not been doing a lot of creating in that time either.  So I'm just checking in to say yes, I am still in the land of the living, and remind you all that I'll be drawing a name tomorrow for the winner of my Christmas giveaway ..... so pop by tomorrow to see who's won.  The Guardian Angel swap is also coming to a close this weekend ...... there were only a few of us in this swap, I know it was all a bit short notice really, with Christmas being so close, but what I've received has been great.  I'll be posting pics of the swap on here after the weekend.

Thursday, 26 November 2009

Paraphernalia

As promised, here are photos of all the pages I created for my "Paraphernalia" board book.  It was great fun making this, especially having a different title to work on for each page, and I really got engrossed in working on it.  Each page in the board book I chose to use had a curved top to it (like a handle) which was ideal because I could stamp the title on each one, as you can see from the pics. 

If you've never thought of altering a child's board book before, then I'd encourage you to have a go - you can pick them up cheaply in all sorts of places (charity shops, car boots, discount book stores, pound shops).  Start off by preparing the board book either the hard way (sanding the surface of each page to form a 'key') or the easy way (if you're very lucky, you can peel away the top thin layer of the page leaving the white inner card core).  Once you've done this, paint a layer of gesso over every page, front and back.  When this has dried, you're up and running ...... you can throw more or less anything at these books, paints, inks, papers, stamping, collage, embellishing ...... just anything you fancy trying out really.


This is the front and back covers.  I used acrylic paints, then stamped a pattern in purple and pink over the pages, and buffed the edges with gold metallic rub-on.  The swirly paper on the front cover was created using a child's SpinArt toy (great fun!) and the word "Paraphernalia" was added using an assortment of alphabet stickers (you don't have to stick to all the same font style for something like this - we've probably all got sets of alphabet stickers where there aren't enough vowels left or only one "T" or something so we can't make up a word with what's left - then using them in this way still works and adds a touch of quirkiness).  I added my details on a torn strip of decorative paper to the back of the book along with a dictionary definition of "paraphernalia", then finished off by threading some fancy fibres and a couple of beads down the length of the spine.


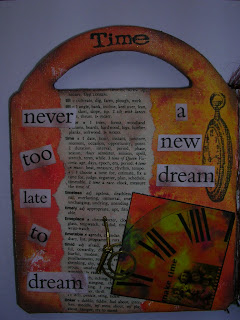
This is my "Time" page (acrylic paint, stamping, torn dictionary page, cut out words, a Crafty Individuals image and metal embellishment knotted with gold elastic thread).


"My Childhood" Page (decorative paper, inked edges, stamped words, a photo of Lindsay and I, handwriting, paper flowers with brad centres and a flower ribbon 'daisy' border).


This is the "Vintage Transport" Page (a collage of torn vintage transport papers and figures designed by Lindsay, a faux stamp and a rubber stamped penny farthing covered with Glossy Accents).


My "Fly Me to the Moon" Page (inked background, stamped and coloured images, acetate tree image, child and butterfly wings from Crafty Individuals, butterfly silhouette shapes and self-sticking ribbon border).


The "Gone Fishing" (for dreams) Page (painted background, fairy and fish paper images with Glossy Accents, pond weed cut from angelina fibres overlaid with alcohol inked acrylic, rubber stamped dragonfly and words).


I chose Summer for my "Seasons" Page (paper with ink distressed edges, a pocket containing a tag with fibres and charms, rub-on word, stamped sun, Crafty Individual image and metal embellishment).


I used all sorts of things on this "French at Heart" Page (stamped tissue paper laid over decorative papers and stamping, a stamped and embossed frame with a Parisian-themed image inside, covered with beads, Paris stickers, a stamped heart shape with feathers and a French coin).


Here is the "Lighthouses" Page (I stamped seashells onto the inked background, the sand was torn strips of more inked background paper, with various images, words and postage stamp added).


Well, this was my "Zetti" Page - or my attempt at it anyway (acrylic paints blended for the background, zetti-type stamped image which I altered with a black pen, a stamped cat image tinted with white pen, then various swirls, dots and words added with Marvy Le Plume pens).


For my "Very Extraordinary Queen" Page I just had to use this image I found of Queen Elizabeth I, as I've always believed her to be one of our greatest monarchs.  I used acrylic paints for the background then handwrote various quotes and facts all around her face to fill the page.  I used some self-adhesive crystals and pearls to highlight her ruff and 'coronet'.


This is the "Gothic Architecture" Page (again, the background was done with acrylic paints, then collaged over with architectural imagery from an old sepulchral book that we have, an acetate 'gargoyle' image and a distressed piece of text about gothic architecture, plus some stamping in sepia ink).


This is the final "Angel Shrine" Page.  I had an extra page in the board book so I had the idea of cutting out the shrine shape in one page, then gluing it down over the angel image on the inside back page.  I stamped and embossed the shrine onto matboard, over a painted/torn paper background.  The heart if a Tim Holtz grungeboard one which I inked up, then added a layer of Beadazzles (microbeads) across the shrine and heart with Glossy Accents.  The "angel" quote was stamped onto the page.

Before I sign off for the night, thanks for the comments already received and I've added your names in for the Christmas draw - but sorry, folks, I'm afraid you'll have to make do with the bead kits and ATC - Mia is definitely NOT part of the deal!  *LOL*

A Little Christmas Giveaway

What dreadful weather we're having this week, it's not stopped raining and the gales are terrific (though we haven't been suffering the same as those poor folk up in Cumbria who've all had to leave their homes due to the massive flooding) ..... anyway, instead of going into town to do my Christmas shopping I've stayed home, catching up on some of my art swaps and projects.

I thought I would have a little Christmas themed giveaway.  I have two cross stitch/beadng kits to make Christmas tree ornaments, plus a Christmas Angel ATC, which I will send to the first person picked at random on FRIDAY, 4TH DECEMBER.  If you'd like to be in with a chance of winning these items, then please just leave a comment on my blog between now and Thursday, 3rd December - remember to include an email or blog address so that I can contact you if you win! 

Here are the two kits - a Charmed Santa Face and a Holiday Beaded Jewel ornament.  They aren't difficult to make, but they're lovely keepsakes for your Christmas tree.


I also created a Christmassy ATC to go along with the kits for the giveaway.  The background for this card is a photo of my Christmas tree last year, to which I've added a strip of deckle-edged alcohol-inked glossy card, stamped with festive words, layered over another strip of creamy paper, with a glittery ribbon secured between the layers.  The angel image is from one of Crafty Individual's little books and I've finished the ATC with a star brad (it was blue so I used a gold Krylon pen to change it and then added a little bit of sparkle with a Sakura Stardust gel pen) and some words cut from an old dictionary.


I've been making a few more ATCs this week as well, some for a "general theme" monthly partner swap that I take part in.  Here's what I've been making:-


I also completed all the pages for a board book swap - "Paraphernalia" - each page had a separate theme chosen by members of the swap.  It's now waiting to be packed up and posted out to its new home (I'll try and post pics of it tomorrow).

Finally, little Mia is 14 weeks old today, so I thought I'd post a few pics of her so you can see how much she has grown - all her Siamese features are becoming much more pronounced now, her face has a sweet chocolate mask, her ears, legs and tail are getting very dark brown and she has a darker line running along her spine too - her tail still has its pigtail curl though!  We also found out that Mia is three-quarters Siamese and one-quarter Bengal (what a mix!!!! ..... we're definitely in for some fun!) ...... her latest favourite game is to chase little balls of screwed up paper and retrieve them - she drops them at our feet ready and waiting for us to throw them again.

Here's Mia, in three quite different moods ........


looking sweet and innocent, washing herself (check out the little pink tongue) .....


........ in playful mood with her favourite ball of paper ......


and drinking water from her own special glass (Mia decided this is much more interesting than using a bowl) .......

Monday, 23 November 2009

Guardian Angel Swap

Hi, just a few lines to say there's still time to join in my Guardian Angel/Ornament swap - these aren't due to me until the 5th December.  So if you fancy a bit of a challenge and you have a bit of free time (yes, I know, WHAT free time, you're asking, with Christmas looming ever nearer), then why not give it a go?  I've made my angel ATC for the swap (no picture yet, sorry) and now have to work on my ornament ..... but if you want to see what Sheila King came up with for this swap, then go check out her blog.  I can't wait to see what these look like in real life!

Friday, 20 November 2009

Back from Harrogate

Well, I finally went and did it ...... I came home with one package too many from the Harrogate K&S Show and I've been wandering around trying to find a home for it (IT being wool - some Manos Silk yarn to knit a shawl/wrap and some James Brett Marble Chunky for a winter jumper) ..... it's now all just sitting in a bag in the bedroom, taking up floor space.  So - that's it - I've finally reached the point where I can't cram anything else into the house, so my New Year's Resolution has GOT to be to have a good clear out in the spare room/craft room and make some ROOM !!  The alternative is to throw my son out of the house and take over his bedroom as it has the most storage space (some great cupboard and shelf space which is definitely being wasted on him)!  *LOL*

Anyhow, had a lovely day out at the Harrogate show, lots of interesting stuff to look at (though not much in the way of papercrafting), and apart from the wool, I also picked up a few shimmery fabric scraps and braid, a Krylon gold pen at a really good price (this was a definite must-buy as my gold pen had run out and I just can't do without my Krylons - I love them for edging or sponging on my ATCs and books) and some Indian print woodblocks which will find a use as stamps in my artwork.  Here's a couple of pics of them.


There were several exhibitions running at the Show and I wish I'd taken my camera now .... I thought I wouldn't be able to take photos, but several people were clicking away at some of the exhibits, so I missed out there.  One exhibit was of a large fishing boat which had been completely covered in knitting, even down to the sea foam, pebbles, water, etc, all around its base.  I remember reading a magazine article about it some time back - visit this BBC link to read more about the project.  I was most impressed by the beautiful and unusual work of a textile artist called Jill Flower - I was fascinated by the Elizabethan style ruffs she had created in very fine detail from paper, words and stitchery.  Click on her name to go to her website to view some of these wonderful pieces in her Gallery.  Unfortunately, you can't get the full effect and see all the tiny details from photos.  I believe she is going to be running workshops (where, I don't know) creating paper brooches using this ruff technique.

On a different subject, if any of you enjoy making "inchies" or fancy having a go at some, go check out Ali's Art Factory blog where she has given herself a challenge to create 10 inchies every day for 10 days and then combine all 100 finished squares into one art piece.  Also, whilst you're there, check out the altered book Ali made with "Tags" as the theme .... it might inspire you to try altering a book yourself too.


Wednesday, 18 November 2009

An Unusual Necklace

Can't believe it's a week since I last posted; the days are just flying by and, frustratingly, I've not had a lot of time to sneak off into my "craft room" (AKA the spare room) to do much art ..... and as for the speed Christmas is approaching, I daren't even think about that ...... I'm really not organised at all (I think I get less organised every year)!

Anyhow, it's an early start in the morning for me as I'm off to the Knitting & Stitching Show at Harrogate with a friend - the coach picks us up from the centre of town at 8.15am.  I've not been to many shows this year, but this one has to be one of my favourites - there are so many stands to visit (and spend money at) as well as lots of interesting exhibitions.  It's quite a challenge to get round it all and have a good look at everything before it's time to catch the coach home again.  I've got a sort of list to take with me of a few bits and pieces that I'd like to buy, but if I'm true to form, I won't stick to it at all and will end up buying something entirely different! 

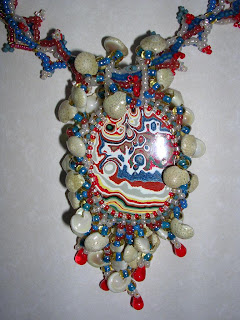
I plan to wear this piece of jewellery tomorrow and I wonder if any of you know what the centre piece is made of (or maybe you've seen it before ...... I was commissioned to create a necklace using this unusual "cabochon" by the UK "Bead" magazine a year or two back).  The colours weren't ones I normally would have selected to use together - the bright reds and blues - but I had some large dyed fossil beads in these colours in my stash and they were perfect for what I envisaged.  Part of the necklace was created using Zulu Stitch and the cabochon was embellished with clusters of pearly shells.  The necklace is reversible as the patterning on the cabochon is different on either side.


Well, did you guess yet?

Can you believe that it's actually made of CAR PAINT?  It's called Fordite (of course, what else?!) and was only available in limited quantities.  Apparently, it's composed of layers of car paint retrieved from an old car manufacturing site which were compressed together to create these amazing swirly patterns.  It's also a very light material so extremely comfortable to wear.

Finally, if any of you are interested in creating chunky books and want to learn a little more about the process, then pop over to Treez Malyon's blog where she's running a very thorough tutorial on a Marie Antoinette book she's creating.  It's very inspiring and might whet your appetite for having a go at making one yourself in the New Year!