Monday 25 January 2010

It's All About Time

A week ago I thought I'd create some ATCs for a "Time" themed swap in one of my groups - easy, plenty of time, only had to make three cards - but could I do it?  No, I could not ...... I made two but then I ran out of time, too late to post the cards before the deadline, so these two are now going into my ATC swapping stash. 


Time, I think, to get my act together and knuckle down for some quality art/craft/creating time .... but I need a good shot of inspiration, I think ..... something to kickstart me again ..... one of the things I like to do when I feel like this is spend a few hours getting messy, creating a variety of background papers, using inks, paints, stamps, glimmer sprays ... it's fun and at the end of the session I've got a whole pile of new backgrounds to dip into.  I was wondering what the rest of you do to give yourself a creative boost when you're feeling like this?

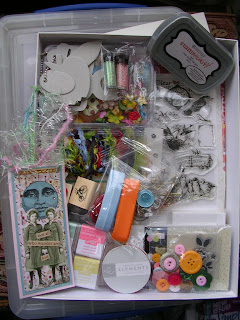
Talking of inspiration, though, look what came in the post for me this weekend ..... the wonderful blog candy prize I won off Kris Dickinson ...... it's a fantastic box full of goodies, you can see some of them in the photo ...... inks, ribbons, buttons, rubber stamps, flowers, embellishments, plus some great decorative papers and collage sheets which I will definitely be making good use of.  What a thrill!


Finally, ever eaten "Chicken in a Basket" at the pub?  Well, here's "Kitten in a Basket" instead ........


Friday 15 January 2010

Dream Journals & an ATC

I finally finished a couple of pages for one of the Journals of Dreams in the round robin I'm involved in.  This journal is Tracy's from the US, rather a large book so quite a different scale for me to be working on, and it's now on its way to Australia for the next leg of its journey.  (No more snow, we've had torrential rain this morning and that cleared away any remaining ice - not particularly pleasant to be out in but at least I can walk around without fear of falling over)!  I used a similar format for these pages that I'd already tried out in a board book "challenge" in another group, we had to create sample pages using step-by-step instructions for a variety of techniques - turned out to be fun and a good way to get you thinking about alternative ways of working. 

For the "dream" pages I first gessoed over them, then added blue acrylic paints, torn paper, black gesso lines (didn't have any black acrylic to hand), images from magazines, stamped a swirly image over the pages using silver acrylic paint, found a relevant quote about dreams off the Internet, cut out and added across the pages, along with a torn strip of scrapbooking paper.  The pages were also "sponged" with watered down black gesso and the edges distressed with TH "black soot" distress ink.  I added lots of stars over the pages using a white gel pen, as well as a plastic star shape which I'd found in some packaging over Christmas, painted with silver acrylic paint and with "dream" and dots added using dimensional blue paint.  I hope Tracy likes these additions to her journal when she finally receives it back.


I also got round to making some ATCs yesterday, some were for a regular monthly partner swap in an internet group, but this one will go into my "small" stash of ATCs for swapping.  I used the remains of some background card I'd made using a mix of bright inks, to which I added a Paperartsy vintage stamped image in black Archive ink - I rather like the contrast of vintage with bright rather than always sticking to more muted tones.  I already had the stamped phrase as an offcut, sitting on my desk, and I just thought it expressed exactly what might be running through the young lady's head - the feather and glitter added to the fun element of the card.  Hope you like it!


Thursday 14 January 2010

.... and the Snow Keeps Coming!

Managed to get out in the car for the first time for about a week and a half today, despite there still being a few flurries of sleet on and off all day.  My parents aren't able to get their car out at all because their drive leads onto a slope which has been like an ice rink for days and days now (if you've read Lindsay's blog you'll know how bad it was over Christmas) so I took them up some bags of food shopping to keep them stocked up for several days.  But can't you guess, despite ALL the warnings about it being so icy where they live, I STILL managed to get myself stuck whilst turning round in the road - I really thought I was on a reasonably (un)icy bit, not on the slope at all, but no - I could NOT reverse, the wheels just spun and even with the handbrake on, the car still continued to slide forward - oops! - thankfully, a neighbour came across and helped to give the car just enough of a push that I could get it moving again and back onto a driveable bit of road!  Not a nice experience - I was glad to get back home again and the car safely back onto the drive.  And now, of course, it's snowing all over again so it looks like we'll be stuck again for a bit longer yet - can't remember ever having had this much snow, for so long, ever before - especially here on the coast, we usually escape the worst of the weather!

And now, a bit of excitement for me too - I just found out I'm the Grand Winner of some wonderful blog candy on Kris Dickinson's blog, aren't I the lucky girl?  Please go check out Kris's site - you'll see some beautiful artwork there and definitely worth checking back into on a regular basis, I know I will be.

Sunday 10 January 2010

A Little Bit of Alteration ........

I can't believe a week has gone by since I last posted here.  We're still in the "big freeze", car marooned on the drive (just too icy and treacherous to risk moving it) and basically I haven't been further than the garden for the past week, talk about getting "stir crazy"!!!  I hope everyone has kept safe and sound during this icy spell, no slips or broken bones.  Despite being so chilly outside, it does look rather lovely - blue skies and bright sunshine - and if I wasn't such a "wimp" on the ice (I can do a brilliant impression of a penguin - LOL), it would be a gorgeous day for a walk.  Oh well, I'm afraid here I'm staying put until the thaw sets in.

I finally got around to finishing something that I had started just before Christmas with the intention of giving it to my sister Lindsay as part of her Christmas pressies - unfortunately, time sort of ran out on me and I had to put it to one side until now.  So, Lindsay, looks like you might be getting an extra belated present, always supposing you'd like it!

I always scour the charity shops when I'm in town, you never know what you might pick up there, and one of my latest acquisitions was this metal tealight holder, which I thought was just asking to be decorated.


The tealight holder was already painted green and I decided to leave this as it was, but you could change this if you wished by sanding it down, adding a layer of gesso, and then painting with acrylics over the top.  Instead, I chose to sponge all the metal parts, both inside and outside, with alcohol inks - I used a combination of Latte, Butterscotch and Gold.  (Before sponging the metal parts, I carefully removed the handle, lid and glass panels - be VERY careful not to cut your fingers when removing the glass, you might like to protect them with a cloth or paper towel).  This is also a very messy process, my fingers were covered with alcohol ink - it helps to squirt a little of the blending solution onto your hands when you come to wash them and give them a good scrub.


The next step was to pad out the space where the tealight would normally sit - I firmly squidged down a good wad of cotton wool, adhered with glue.  I had bought a small "guardian angel" resin figure which exactly fitted over the top of the tealight holder and I glued it down with some Glossy Accents. 


I added a layer of gold Stickles around the base of the "angel" and left it until it was completely dry (patience required here)!


The next thing that I decided to do was to adhere a sheet of double-sided tape to one side of two of the glass panels.  I then laid some gauzy fabric (mine had butterflies and dragonflies on it) over the glass with the right side of the fabric facing the sticky side of the glass.  I cut away the excess fabric and then slid each glass panel back into the tealight holder, either side of the hinged door, with the plain glass panel in the back and front.


I dribbled some more Glossy Accents around the base of the tealight, placed a white feather behind the angel and scraps of scrumpled fabrics/netting to cover the base.


I continued adding more embellishments around the "angel" - a butterfly charm (I only had silver ones so I altered it by colouring it with a gold Krylon pen), bronze pearls and a pearly bead chain, all glued to the netting/fabric with drops of Glossy Accents.


I covered the tealight "funnel" with double-sided tape and wrapped it with a vintage piece of tassel-edged trim.  I ran my gold Krylon pen around all the edges of the lid and panels, then wrapped the handle with thin gold ribbon and the beaded chain.  I also fastened a "word" charm to the handle (a Tim Holtz Philosophy charm - Believe), which I softened with a little gold metallic rub-on.  I reassembled the tealight holder then, as a final step, using a cotton bud, rubbed copper Stickles (I'd run out of gold) over all the surfaces.  Again, make sure to leave plenty of time for drying before you handle the finished item ..... and here it is ....

I hope you like it .... and perhaps it's given you some ideas for altering small items that you might come across in your local charity shop or car boot sale.  Why not have a go at giving something old a new lease of life and if you do, I'd love to see pictures of what you come up with!

Meanwhile, don't forget about the "Out with the Old, In with the New" ATC swap I'm running here - there's plenty of time to have a go at making some cards (the closing date is 12th February) - several have signed up already and I can't wait to see what everyone comes up with!




Sunday 3 January 2010

Out with the Old, In with the New .......

A rather belated Happy New Year 2010 to you all !  After a quiet Christmas at home, with family and friends, and being snowed in for a good part of the time too (impossible to get the car out of the drive for several days due to all the ice), I started the New Year off by wrenching my back - just one of those daft things, bent down to pick something up and ended up pulling a muscle!  As a result, I've been hobbling around for the past three days, not able to do very much at all, plus the damp weather triggered off a bout of arthritis in my wrists, so I've not been able to type more than a few lines or do any sort of craftwork - so frustrating!  I think I'm over the worst of it now and I hope you've all had a better start to the new year than I have.

Mia certainly enjoyed her first Christmas as part of our family - here she is surrounded by goodies, definitely in the mood for a party .......


I received some lovely crafty gifts from my family this year and here's a picture of what I got ..... a tag punch, TH distress embossing powders and rubber stamps, Cosmic Shimmer spray and pigment set, Viva Croco crackle and precious metal colours and a big pad of Fabriano art paper ..... lots to play with .....


So, it got me thinking about what to start the New Year off with by way of a little challenge, and I came up with the idea of combining the old and the new.  I'm sure we all have lots of bits and pieces lying around in our craft area/room/box, the leftovers from other projects, too useful to throw away, but you're not sure what to do with them - even a quick rummage in your wastebin might reveal some interesting bits that you've discarded - or what about all the leftovers from Christmas - tinsel, wrapping paper, ribbons, tags?  We have probably also got something stashed away that we bought some time ago, but have never yet plucked up the courage to use, or maybe, like me, you received some new crafting goodies for Christmas.

So ...... what I'd like you to do, if you fancy taking up the challenge, is create THREE ATCs using at least three "old" items to embellish each card and one "new" item - anything you like that you've not yet used in your art - could be a stamp, paper, ink, paint, its entirely up to you.  You can also create your ATCs in any theme or style you like.  How about it?  Just a little bit of fun to kickstart the New Year and get us all in the mood for creating over the next 12 months.

If you're interested in joining this swap, just send me an email to let me know (details of the swap are in the sidebar).

I'd love to have you join in this little challenge and hopefully there'll be plenty of you to make this a really good swap.


A VERY HAPPY NEW YEAR TO YOU ALL !