Wednesday, 30 September 2009

I've had a great response to the Witchy ATC swap, the number of people signed up means there are going to be some wonderful cards coming in - if you're still dithering about whether to join up or not, then I'd say jump in, have a go, have fun .... you don't want to miss out on this one.  I've had word that the first set of cards is finished and is on its way to me already ..... can't wait to see what they turn out like!  If you want to see some more that have been made for this swap, then check out my sister Lindsay's blog - she's just posted a pic of the scary witches she made over the weekend!

Just been doing a bit of this and that the past few days - came down with a cold for a couple of days so didn't feel up to doing very much, but on the mend now.  I mentioned in an earlier post that I was having a go at creating some zetti pages; I did the colourful backgrounds and the next instruction we were given was to add paper/magazine cutouts and images to the pages.  So I spent some time searching through my pile of papers torn from mags, etc, to find suitable pieces to stick onto the pages.  Here are some of what I did.  I'm not sure if I'm doing this right yet, but I'll find out when I get the next set of instructions next week!  They all look pretty strange at the moment, don't they?


I'm also working on a couple of board books - you can quite often pick up old children's board books in charity shops or at car boots.  I'm only just discovering how good they are to work on and alter.  Once you've prepared the surface of the pages - either by a lot of sandpapering to rough up the surface or, if you're lucky, the top layer of paper peels off easily - you cover them all with some gesso and then you can more or less throw anything you like at them - add papers, inks, paints, ribbons, embellishments, all sorts .... a lot of fun, especially if you find a book with little cutouts in it or odd shapes, lots more possibilities for altering!

In one of the board books I'm trying out different techniques, mostly with acrylic paints, torn paper strips, ink washes, gesso stamping and printed quotes .... again, this is another little challenge on one of my atc groups.  The other board book I'm working on is entitled "Paraphernalia" and each person in the swap suggested a page title - mine were "Fly Me to the Moon" and "Gothic Architecture", others included "Angel Shrine", "Seasons" and "A Very Extraordinary Queen" (12 titles in all).  The idea behind this swap is that we each work on our own board book, creating a page for each title, as well as decorating the front cover and putting our details on the back.  In November we will be told who our swap partner is and then post out the finished book to them as an early Christmas pressie!  I only just started decorating my book this week so I need to get a move on - here is a picture of the first couple of pages, I've added an extra flower now to the second page since I took the photo, and when the book is finished I'll probably go back through it and add more ribbons, fibres, charms to the pages.


And yes, the photo IS one of Lindsay and I when we were young!!!  Who knew what we'd turn out like?  *LOL*

Finally, for tonight, here is another Witchy ATC that I finished making today.  The ghostie glows in the dark!


Friday, 25 September 2009

Look what happened to my Ladies !

I had a lovely email from Nancy Allen in the USA, showing me what she did with three of the vintage lady images - she turned them into a trio of Witches for a 4" x 4" sized page in an accordian book she's making for herself.  Nancy kindly said that I could post a picture of them here for you all to see - aren't they great? - and maybe give a little inspiration for creating atcs from them.


The response to the Witchy ATC swap has been pretty good - as it's the first swap I've posted here on my blog, I just wasn't sure how many people would be interested in joining in so I suggested only making one or two cards, to ensure no-one received their own cards back again.  BUT I've decided that you can send in one, two or THREE cards (entirely up to you how many - you will receive back the same number of cards that you send in).  I hope you all enjoy making your witches and for anyone who's hesitating ..... just jump in, have a play around with the images and see what you can come up with - you'll have fun.  (There's still plenty time to join up - just email me for details).

Tuesday, 22 September 2009

More Vintage Ladies and a Witchy ATC Swap

Okay, so it's the Autumn Equinox (night and day are equal length - and can you believe we're actually into autumn already)?  And then it'll be Halloween at the end of October - not so big an occasion here in the UK as it is in the US - but it just gave me the idea that it might be fun to take one of these vintage ladies and turn her into a witch - any kind of witch that takes your fancy - nice and friendly, funny, creepy, scarey, weird, anything goes!  I've added a bit of info about the swap in the sidebar, along with a Witchy ATC that I created today, using one of the images I posted last week - the background was made using one of those old Spin Art toys, pouring different acrylic paints onto card whilst it's spinning - a different effect every time and so much fun!  (This card will be going into the swap too).  If you want to have a go at this, email me to let me know you're interested - the deadline will be 23rd October.

So - I thought I would add some more vintage ladies for you - once you have downloaded them to your computer (double click to enlarge pic, right click to save image as jpeg), you can resize them to fit an atc-sized card.  I hope I can entice a few of you to have a go at creating a witchy lady, I'd love to see what you all can do!


Sunday, 20 September 2009


My sister, Lindsay, was giving a crafting demonstration today (well, yesterday now) at the Strikes Burnside Garden Centre, near Blackpool, so I went over to spend a few hours there and pick up a few crafty technique tips from her. 

As well as demonstrating Nestabilities, amongst other things Lindsay also showed us how to create a lovely wintry background for a card using distress inks, water and a mini-mister - she then removed some of the ink from inside one of the stamped images (a dove), using a water brush - the ink disappeared as if by magic!!  It's a technique I'm definitely going to have a go at! 

Here are a few pics of some of Lindsay's cards (check out her black inky thumb on the robin card pic)!!!


It was quite a busy afternoon and I had the pleasure of meeting up with Joanne, who had admired my "mermaid" atc (pic in previous post) - so as I had my meagre stash of atcs with me (just got to make time to make some more!), we exchanged cards - my mermaid card for a lovely one of a stamped embossed bird (one of my favourite themes at the moment) on an orange (one of my favourite colours at the moment) inked background with the word "blissful" - I was very happy to have it.  I also did an atc swap with Lindsay.  I don't often get the opportunity to swap atcs face-to-face so it was an unexpected treat.

By the way, Lindsay has been having some computer/internet problems for the past few days so has been unable to contact anyone via email or update her blog .... hopefully she'll be back online in a day or two and posting to her blog again.

I'm planning on running a themed atc swap on my blog soon, not quite ready to say what it will be yet, but watch this space!


Wednesday, 16 September 2009

Last week I said that I was joining in a project to create zetti pages and the first thing we all had to do was cover our pages, front and back, with a colour wash - using one or more colours.  So I had a session creating very colourful backgrounds onto some heavy watercolour paper.  For some I used acrylic paints and others, "Sticky Fingers" acrylic inks - they all turned out pretty bright and colourful (which was my aim), as you can see.
The backs of the pages were done in different colours to the front, but the size was bigger than I needed for the project, so I had to cut them all down with my guillotine - which left me with lots of colourful strips, including strips where the pages were pulled off the binding in the watercolour pad.
So I then thought I'd like to make some atcs using some of these jewel-coloured offcuts and also try to make use of the torn binder strips too, just to see how effective they could be and not waste anything.  These are the three atcs I came up with - I've used some vintage-style rubber stamps on a couple of them, along with extra embellishments - brads, adhesive gems, colourful plastic discs, stamped hearts with gold cord and dictionary words.  For the mermaid card I added some alcohol inked clear acrylic, beading, angelina fibres and little shells - all scraps and oddments from my stash.  I'm quite happy with the way they all turned out and it just goes to show what you can make with a few offcuts and bits and bobs lying around.

Now that I've finished my zetti background pages, the next thing we have to do is add some images and paper cutout shapes to each page - it's all new to me so I'm intrigued to see how my pages eventually turn out, but it's certainly fun to have a go at trying out a new style of art or technique.  I'll let you know how I get on!

Tuesday, 15 September 2009

Some Vintage Ladies for You

It's been a few days since I last posted, have been doing a few arty projects but no photos yet to upload (hopefully I'll get round to showing you what I've been making soon). 

Sooooo, in the meantime ..... I thought you might like some images of vintage ladies that you can download and use in your own artwork.  I have quite a collection of cabinet cards and cartes de vue (these were photographs, generally portraits or family groupings, taken by studio photographers in Victorian/Edwardian times - often they would mark some special occasion, such as a birthday, wedding or engagement).  The original cabinet cards have a sturdy card base and the backs are often very ornately decorated with the photographer's details on them.  The cards are great for working on and altering too - you can throw virtually anything at them, inks, paints, gesso, stamping, embellishments ..... so that a once discarded photograph gains a new lease of life as a piece of art.  They're really fun to work on too; I've been in a few international swaps for altered cabinet cards and received some wonderfully humorous and imaginative pieces in return.

Anyway, here are some vintage ladies for you, they are images from some of my cabinet cards and you can use them any way you like.  Just double-click on the image to enlarge it, then right click to save to your computer (as a jpeg).  I would love to see what you do with them - if you do create a piece of artwork using one of the ladies, it would be great if you emailed me a picture of it and I'll show it off here for everyone to see.  (You can email me via the link on my About Me profile page).


If you like these images and want some more, just let me know ..... more ladies, children or gentlemen ..... or family groups? ..... the choice is yours! 


Thursday, 10 September 2009

An ATC Fan

At least the weather has perked up a bit again after the past few dreary wet days - the sun's been shining and apparently it will continue to shine right through to the weekend (or so the weather folks tell us)!  It's amazing how much more cheerful everyone feels with a bit of sun on their faces - maybe we're going to have what they call an Indian summer after all, though there's definitely an autumnal feel in the air too - not an unpleasant feeling though, I actually rather like that hint of cool, clean freshness as the sun starts to slip down the sky at the end of the afternoon. 

Anyway, I thought I'd show you pictures of a piece I created for a swap recently.  We were each sent instructions and an example of how to construct an atc-sized folding fan by the hostess (Laura Carson).  The fan was constructed out of five atc-sized "blades" with curved tops, we could decorate and embellish them however we liked (bearing in mind which parts would be hidden when the fan was folded).  The blades were attached together by a series of ribbons on the back which had to be assembled in a particular way so that the fan could fold up and a brad held the base of all the fan blades together.  It took me a good while to get started on mine because I wasn't sure how I wanted to decorate it and also wasn't sure how easy it was going to be to put it all together - I thought I might end up making a real mess of it all !  Well, I eventually chose an oriental theme and embellished the fan with beads, ribbons and one of my own beaded dragonflies (the instructions for this dragonfly are included in one of the projects in my book).  Everyone in the swap was allocated a partner to send their fan to, so mine has now gone to a new home in Australia.


I'm going to be having a go at creating my first zettiology pieces soon.  A small group of us will be making a page in zetti style for each person (five others plus myself).  Ali, who has organised the group, will be giving us bit by bit instructions for creating our pages over a six month period.  The first thing we have to do this week is paint a colour wash onto our pages - we won't know what we're going to be doing next until after we've all done our painting - any colour, one or many, with or without textured effects.  Well, you may be asking, what on earth is "zetti"?  Not easy to describe I'm afraid, all rather surreal-looking, heads and bodies all mixed up, black and white stripy legs, hats, lots of colour ..... hmm, if you really want to know what I'm talking about go take a peek on  Teesha Moore's website and have a browse around, you'll understand what I'm talking about!  Anyway, I shall keep you posted of my success or otherwise!

Sunday, 6 September 2009

My Gypsy ATC

Well, I had a lovely day at the show in Manchester - there were quite a few things to tempt me this time and I didn't stick to my shopping list apart from a couple of items (I never do, of course - don't really know why I bother making one - it's just the organiser in me likes to have "lists")!  Anyway, I couldn't resist buying some art books (books being one of my weaknesses), Glimmer Mist in some gorgeous colours (I love the effect of the mica when you spray your paper with these - great for making backgrounds) and some Tim Holtz Grungeboard (mixed minis, to add to the swirls I already have) ..... so plenty to keep me busy there.

If you go over to Sarah McCrossan's blog you'll see that she's offering some blog candy - to be in with a chance of winning, you need to leave a comment on one of her posts.  I have offered to add one of my ATCs to the "candy" and this is the one that I'll be sending to Sarah tomorrow.  It's "Magdelane - The Gypsy Girl" .... one of my painted and stamped backgrounds, overlaid with collage images, beads, feathers and fibres. 


Friday, 4 September 2009

Dreams & Amour


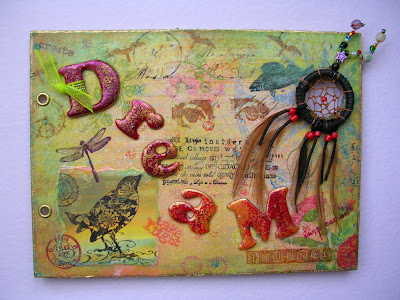
It's been one of those weeks, I've not had a lot of time to devote to any artwork, but I have at least managed to finish the front and back covers for the Journal of Dreams round robin swap that I mentioned I was involved with.  My journal is about 5" x 7" (give or take half an inch each way) and I'm quite happy with the way it's turned out.  The front cover has embossed chipboard letters to form the "Dream" word - I sprinkled two different embossing powders on them (red and orange) in varying proportions to create a graduated colour effect.
I've added some beads to the top of the dreamcatcher (earring) too and more on the inside cover, along with feathers and some brass "bits" I found in one of my boxes - the moon face was just perfect for the dreamcatcher circle.  I embossed the word "dream" along one side of the page and added a few lines about the meaning of the Dreamcatcher.  I've kept the back page fairly simple - decorative, collagey paper; metal corner pieces, ribbon, stamped words and a layered paper flower, stamped with text, and finished with a button centrepiece.  The inside cover has the names of all the participating artists.  I may well add more embellishments or words to these covers once the journal has finished its travels and come home again, but I don't want to make them any heavier as they've a long journey ahead of them (there are 16 of us)!  I've still got to create my own "dream" page for my journal before I can send it on its way, so I'm going to have to get cracking on that over the weekend.

Well, I had a lovely post this morning as my Amour et Romance tag book arrived.  All the tags I made have been added to the books sent out to others who joined this swap, but doesn't mine look gorgeous - I just love the delicate colours in it and all the dangly beads?  Each tag was created by a different artist, including the hostess, Alison, who did a great job of putting all the tag books together and adding wonderful fibres and charms to each one.  I'm really pleased with it; well, wouldn't you be too?


Tomorrow (well, actually it's today now!) I'm having a day out and going along to the craft & stitch show at Manchester Central (the old G-Mex).  I need to pick up a few crafty supplies (tape, glue, brads, that sort of thing) but I'll keep a lookout for anything a bit more unusual (not that I really NEED anything at all, my crafting space (ie the spare room) is pretty well jam-packed already - still, it won't stop me being tempted)!  I'll just enjoy having a bit of time out for myself, if nothing else.