If you've never thought of altering a child's board book before, then I'd encourage you to have a go - you can pick them up cheaply in all sorts of places (charity shops, car boots, discount book stores, pound shops). Start off by preparing the board book either the hard way (sanding the surface of each page to form a 'key') or the easy way (if you're very lucky, you can peel away the top thin layer of the page leaving the white inner card core). Once you've done this, paint a layer of gesso over every page, front and back. When this has dried, you're up and running ...... you can throw more or less anything at these books, paints, inks, papers, stamping, collage, embellishing ...... just anything you fancy trying out really.
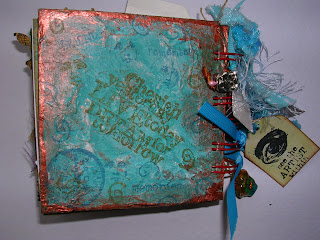
This is the front and back covers. I used acrylic paints, then stamped a pattern in purple and pink over the pages, and buffed the edges with gold metallic rub-on. The swirly paper on the front cover was created using a child's SpinArt toy (great fun!) and the word "Paraphernalia" was added using an assortment of alphabet stickers (you don't have to stick to all the same font style for something like this - we've probably all got sets of alphabet stickers where there aren't enough vowels left or only one "T" or something so we can't make up a word with what's left - then using them in this way still works and adds a touch of quirkiness). I added my details on a torn strip of decorative paper to the back of the book along with a dictionary definition of "paraphernalia", then finished off by threading some fancy fibres and a couple of beads down the length of the spine.
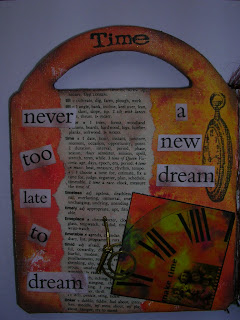
This is my "Time" page (acrylic paint, stamping, torn dictionary page, cut out words, a Crafty Individuals image and metal embellishment knotted with gold elastic thread).
"My Childhood" Page (decorative paper, inked edges, stamped words, a photo of Lindsay and I, handwriting, paper flowers with brad centres and a flower ribbon 'daisy' border).
This is the "Vintage Transport" Page (a collage of torn vintage transport papers and figures designed by Lindsay, a faux stamp and a rubber stamped penny farthing covered with Glossy Accents).
My "Fly Me to the Moon" Page (inked background, stamped and coloured images, acetate tree image, child and butterfly wings from Crafty Individuals, butterfly silhouette shapes and self-sticking ribbon border).
The "Gone Fishing" (for dreams) Page (painted background, fairy and fish paper images with Glossy Accents, pond weed cut from angelina fibres overlaid with alcohol inked acrylic, rubber stamped dragonfly and words).
I chose Summer for my "Seasons" Page (paper with ink distressed edges, a pocket containing a tag with fibres and charms, rub-on word, stamped sun, Crafty Individual image and metal embellishment).
I used all sorts of things on this "French at Heart" Page (stamped tissue paper laid over decorative papers and stamping, a stamped and embossed frame with a Parisian-themed image inside, covered with beads, Paris stickers, a stamped heart shape with feathers and a French coin).
Here is the "Lighthouses" Page (I stamped seashells onto the inked background, the sand was torn strips of more inked background paper, with various images, words and postage stamp added).
Well, this was my "Zetti" Page - or my attempt at it anyway (acrylic paints blended for the background, zetti-type stamped image which I altered with a black pen, a stamped cat image tinted with white pen, then various swirls, dots and words added with Marvy Le Plume pens).
For my "Very Extraordinary Queen" Page I just had to use this image I found of Queen Elizabeth I, as I've always believed her to be one of our greatest monarchs. I used acrylic paints for the background then handwrote various quotes and facts all around her face to fill the page. I used some self-adhesive crystals and pearls to highlight her ruff and 'coronet'.
This is the "Gothic Architecture" Page (again, the background was done with acrylic paints, then collaged over with architectural imagery from an old sepulchral book that we have, an acetate 'gargoyle' image and a distressed piece of text about gothic architecture, plus some stamping in sepia ink).
This is the final "Angel Shrine" Page. I had an extra page in the board book so I had the idea of cutting out the shrine shape in one page, then gluing it down over the angel image on the inside back page. I stamped and embossed the shrine onto matboard, over a painted/torn paper background. The heart if a Tim Holtz grungeboard one which I inked up, then added a layer of Beadazzles (microbeads) across the shrine and heart with Glossy Accents. The "angel" quote was stamped onto the page.
Before I sign off for the night, thanks for the comments already received and I've added your names in for the Christmas draw - but sorry, folks, I'm afraid you'll have to make do with the bead kits and ATC - Mia is definitely NOT part of the deal! *LOL*


